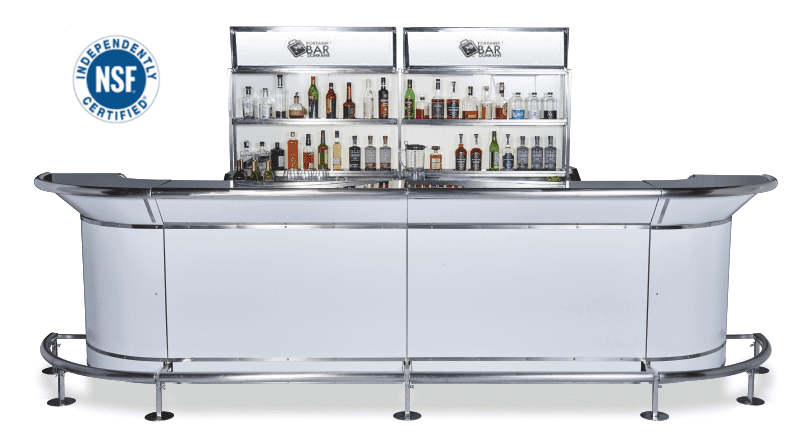
The Flash Bar calculator (aka the Flash Bar builder) is available 24/7 and provides a walk-through of all the available Flash Bar options. It is custom designed for selling the Flash Bar online without ever seeing the bar in person. It provides itemized pricing, the footprint dimensions, comparison charts for accessories, as well as modest renderings to help you visualize your creation.
This blog will walk you through the builder. Click here to access the builder and follow along, step by step. Please note it’s best to use the builder on a computer rather than a phone or tablet. Also, if you are having issues on a desktop, try it in a different browser such as Google Chrome.
Step One – Building the Shape:
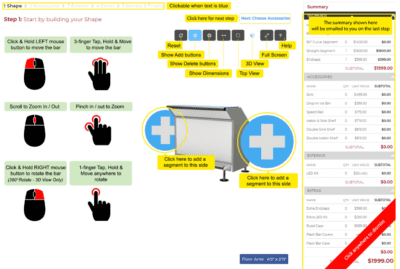
This might look overwhelming at first, but it’s quite easy. The first step is all about building the Flash Bar shape. (If you want to add a Modular Back Bar, we’ll do this later, so let’s stay focused on the front bar shape.)
Before beginning, read through the mouse instructions (green) and the builder instructions (yellow). Click on the calculator anywhere to make them disappear. If you get stuck, bring the instructions back by clicking on the (?) button.
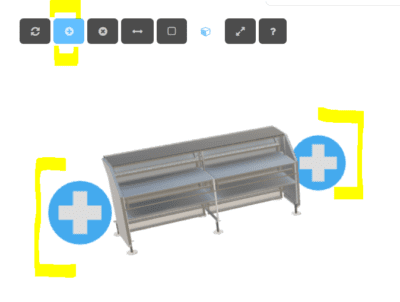
To begin building the bar, the calculator will automatically be set to Adding Mode. Start by clicking on the blue (+) sign. Select the shape segment you want to add. As you’re adding segments, monitor the bottom right corner for the footprint dimensions in the little blue box. (If you want to find out individual segment dimensions click on the link in the lower right hand corner to be taken to our resources page.)
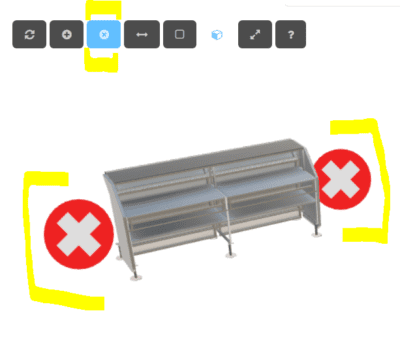
If you made a mistake and need to remove a segment click on the third button from the upper left corner shaped as an (x). This will put the builder in Removal Mode where you see red (x)’s instead of blue (+)s. When you’re done removing segments click the grey (+) button to switch back to Add Mode.
Adding Mode
Removing Mode
As you add and take away segments, the pricing list to the far right will update automatically to show the price of what’s pictured.
Here is a brief explanation of the remaining buttons we haven’t mentioned:

This will delete the current structure, so you can start a new design. Be careful with this tool!

This shows a bird’s eye view of the footprint and a more detailed look at the dimensions

This changes the view so that the bar is seen from a bird’s eye’s view (zoom in and out by right clicking and using your mouse’s zoom)

This changes the view so that the bar is seen at angle from its side (zoom in and out by right clicking and using your mouse’s zoom)
Once you are satisfied with your shape, it’s time to pick the accessories and plan out how the bar can be used.
Step Two – Adding Accessories
This is all about the inside of the bar. Adding accessories will change a bar from a simple point of sale structure to a substitute for a full service permanent bar. We have different options for Sinks, Ice Bins, Speed Rails and Shelving. One of the best things about the Flash Bar is the ability to retrofit accessories. So, there is relatively no pressure in getting this perfect the first time. You can always add an accessory later. Same goes for replacement parts. Since the bar is modular, you’ll never have to replace an entire unit due to a broken or faulty part. Let’s add accessories!
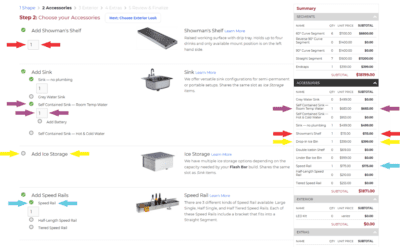
Showman Shelf (Red)
This is for the flair bartenders and craft cocktail connoisseurs! It’s raised working space with a drip tray, so you can put on a show and contain the mess. You can install it on the right, left or both sides of a straight segment. Calculator has a preprogrammed maximum allowance of two per a segment.
Sinks (Purple)
We have several options for sinks. To help figure out what sink option works best for your operation, click on the Learn More link for a side by side comparison. You will only be able to add 1 sink per a segment due to space restrictions. The calculator might block you from adding more ice bins or sinks if you’re trying to use more accessories than the structure you built in step one allows.
*Coming soon* We have a four basin sink in the works. Contact us at (877) 307-5944 to sign up here to get product info emailed.
Ice Storage (Yellow)
We have three options for ice storage. Click on the Learn More link to get details on each option. You can add up to two 11.5 gallon-ice-bins for one straight segment or one Under Bar Ice bin per a straight segment. It’s important to note that adding two of the smaller ice bins to one straight segment will take up the entire working surface of one straight segment. Also, the Under Bar Ice Bin can be used as a standalone unit or replace the shelving area of a straight segment.
Speed Rails
We have three options for speed rails because we know the micro differences count. Especially in high volume locations. The Speed Rails only fit on the straight segments. The ½ sizes fit on the left or right. The full speed rail takes the full length of a straight segment. Just like the other sections, click on the Learn More button to get a side by side comparison.
Step Three – Exterior
This is all about the look of the bar. I this it’s safe to say this is the most fun part of creating your own bar. I mean, who doesn’t love a makeover!?
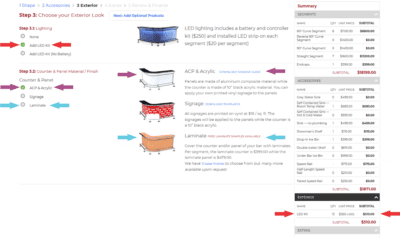
To start, every bar comes with white Aluminum Composite Panels (ACP) and black acrylic counters. We get asked all the time if the bar looks good without any upgrades and it 100% does. But if you want to do your own thing, here is the breakdown of how to add it with the calculator. The red arrows (seen below) are just to help you see that when you select LED options where it impacts the calculator. The purple and teal arrows (seen below) are there to show the example photos and more information provided in the middle section.
Step 3.1 is all about LEDs!
The LEDs work with all exterior options because they’re installed under the counter and shine down on the panels. If you select the LED’s the builder will automatically calculate the quantity and price for the upgrade based on the structure you built in setp 1. The only decision you need to make is whether or not you need a battery for a cordless operation.
Step 3.2
This step starts out with the standard ACP front panels & black acrylic counters. Selecting this option will not change the price since these come standard.
As for the panels, you can leave them white. You can upgrade to Vinyl Printing that gets installed on the ACP panels. Or you can upgrade to a laminate which is a different material that’s also installed on the ACP panel. Once you add the finish you want, the calculator will add up the cost of putting the exterior option on all the panels in your formation.
As for the counters, like we stated before, it comes with a black acrylic counter. You can upgrade to a laminate counter using the builder. But if you are planning to use the bar outside, I would stick to the acrylic inserts instead.
*Coming Soon* we will have a new material for counter inserts called Seaboard. Seaboard is a marine grade material and it’s the most durable material we’ve ever offered. It will also add a solid white counter option to the Flash Bar. Contact us at (877) 307-5944 to sign up here to get product info emailed.
- Step (TBD) – Modular Back Bar – This section is currently getting worked on. It should be up relatively soon. For now you can use our modular back bar page to quote out Modular Back Bar options linked here.
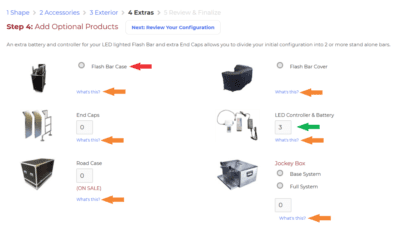
Step 4 – Extras
For the most part these are self-explanatory, but here is a quick run through.
Flash Bar Case – These cases have fitted storage. If selected the builder will automatically calculate a 1:1 ratio per a segment. These cases don’t fit the boxier accessories like Ice Bins, Sinks, and Jockey Boxes. The red arrow seen above just shows you where to select this option. The orange arrow shows “what’s this?” hyperlink that will allow you to click to learn more about the Flash Bar Case.
Covers – If this is selected the builder will determine how many covers you need for your segment. The covers detach and reattach by the segment. So, if you change your shape or remove a segment on site, the covers can be rearranged to fit the new shape. The orange arrow shows “what’s this?” hyperlink that will allow you to click to learn more about the covers.
End Caps – Buying extra end caps gives you the flexibility to make one bar into multiple smaller bars depending on how many straight segments you have. If you buy 8 end caps and 8 straight segments, you can have one 30 ft+ bar (with seven end caps left over) or 8 small 4 ft bars operating all at once independently (with zero end caps left over.) The orange arrow shows “what’s this?” hyperlink that will allow you to click to learn more about the added end caps.
Extra LEDs – However many end caps you get, is how many extra LED Kits you should have.
Road Case – This case has empty storage. It fits every accessory we have. If the case is only storing segments, then it fits any combination of two segments. Adding accessories makes it a little trickier to estimate. The calculator will do it’s best to correctly guess how many cases you need. A sales rep will verify once the quote is submitted and reviewed. The orange arrow shows “what’s this?” hyperlink that will allow you to click to learn more about the Road Case.
Jockey Box – This is an electricity free draft system. One box has two beer lines. You need at least half a shelf of a straight segment to use it on a Flash Bar. The difference between a full system and a base system is listed in the “What is this” section. The orange arrow shows “what’s this?” hyperlink that will allow you to click to learn more about the Jockey Box as an added extra.
Step 5 – Review, Finalize, & Submit for a full Quote & Lead time
This will give you a final look at your creation and the final cost before shipping and tax. Once satisfied with your bar select send a quote. This will email you a confirmation and us a quote request. If you want us to get back to you, it’s important the contact information is accurate. If you need the quote rushed, or the actual bar by a specific date, or you want to reach a specific rep, or anything you have a question about. Write it in the message section is important, if we did not offer something or you have a quaetion, please post it in this section. The more info you give us, the better prepared we’ll be for addressing your concerns in your custom quote.
The final cost will include shipping and sales tax (if you’re located in CA.) This will be sent to you in an official estimate within 1 business day of the quote being submitted online. This is where the lead time will also be discussed.
Other resources:
- The dimensions of all portions of the flash bar can be found here.
- A video about the Flash Bar can be seen here.
- A gallery of finished bars can bee seen here.
- Testimonials can be seen here.
Give us a call!
Using the Flash Bar builder takes 5 – 10 minutes and is the fastest way to get familiar with all the available upgrades.
If you have any questions about this guide or modular bars in general, give us a call at (877) 307-5944. We will be happy to walk you through the process.
If you have questions, please call or email us
Becky Foster – Sales Manager
